
A real 50% discount on VyprVPN for a limited time
Encrypt your internet connection with VyprVPN to protect your privacy and secure your connection. Prevent your ISP or third-party snoops from viewing your online communications, location and browsing activity.
Click here for a sale offer on VyprVPN →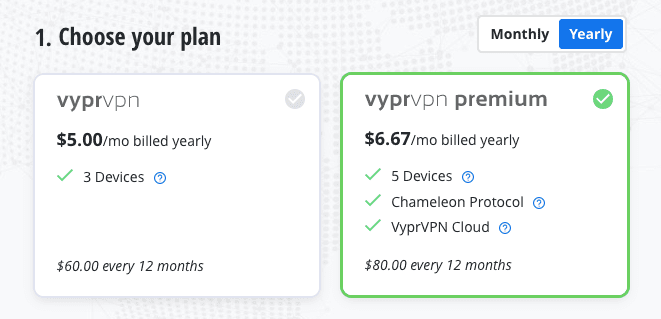
Here’s how to get valuable promo codes for VyprVPN
Step 1:
No tricks sale on VyprVPN with no coupons
Step 2:
Create an account and use this bonus code to get started with VyprVPN

Try one of these 7 VPN services using these discounts
Kaspersky VPN

Get enormous 63% OFF on Kaspersky VPN service
Average Price
4.79$
Sale Price
2.50$
3 Years Sale Price
239.97$
89.98$
Save Money
63%

3490
users successfully used this promo
ExpressVPN

Sale up to 36% OFF on ExpressVPN software
Average Price
10.42$
Sale Price
8.32$
1 Years Sale Price
155.4$
99.95$
Save Money
36%
23456
users successfully used this promo
CyberGhost

Save 79% on your CyberGhost plan, limited time offer
Average Price
9.06$
Sale Price
3.95$
3 Years Sale Price
467.64$
99$
Save Money
79%
5419
users successfully used this promo
Encrypt.me

Get a 17% discount today on Encrypt.me
Average Price
9.16$
Sale Price
8.33$
1 Years Sale Price
119.88$
99.99$
Save Money
17%
19
users successfully used this promo
Hide My IP

A real 41% discount on Hide My IP for a limited time
Average Price
3.60$
Sale Price
2.91$
1 Years Sale Price
59.40$
34.95$
Save Money
41%
496
users successfully used this promo
Speedify

Incredible 56% savings on Speedify with these promo codes
Average Price
6.49$
Sale Price
3.99$
1 Years Sale Price
107.88$
47.88$
Save Money
56%
1302
users successfully used this promo
LiquidVPN

Savings of up to 32% by using this bonus code for LiquidVPN
Average Price
5.88$
Sale Price
4.75$
1 Years Sale Price
84.0$
57.0$
Save Money
32%
36
users successfully used this promo

Answers to all of your VPN questions
Q:
How to Setup VPN on Mac?
A:
Macs are known for their security and resistance to malware, but they don’t protect you from snooping and internet surveillance unless you take advantage of the built-in VPN client:
• Step 1: Click the Apple icon and select System Preferences.
• Step 2: Choose Network.
• Step 3: Create a new network connection by clicking on the plus sign.
• Step 4: Choose Interface and select VPN from the dropdown menu.
• Step 5: Name your VPN connection and choose its type.
• Step 6: You will be asked to enter the IP address of the server you want to connect to and provide the corresponding password and shared secret or certificate.
• Step 7: Finally, click Apply and then Connect.
We highly recommend you verify your connection by visiting an online IP address checker to see if your real IP address is hidden.
Q:
How to Use VPN on Windows?
A:
VPN technology allows you to establish a private connection on a public network, and the Windows operating system comes with a built-in VPN client that you can use to connect to any VPN server:
• Step 1: Open the Start Menu and click on the Settings gear icon.
• Step 2: Go to Network & Internet and choose VPN.
• Step 3: Click Add a VPN connection at the top of the VPN screen in the Settings app.
• Step 4: Enter the details for your VPN connection in the screen that appears
• Step 5: Fill out the “Connection name” and “Server name or address” fields.
• Step 6: Enter your user credentials and click Save.
• Step 7: Click the Wi-Fi icon in the system tray on your taskbar and choose the newly created VPN connection.
 Get a discount →